The after school gingerbread project: rolling & baking
by Aimee
Yesterday’s project was all about sifting and stirring; today is about snipping and sizing. It’s both a craft project and a baking project, so you’ll need scissors and a rolling pin.
Once again, Noah and Mateo are your hosts for this step, and they begin with cutting out the template for the gingerbread house pieces.

Print the Template.
My good friend Marian of Sweetopia has created a handy – and exceedingly adorable – gingerbread house template (that is, the pattern we will be using for the house. The building plans!) It is free for you to download and print right HERE, so I suggest you get right on that!
Marian also has some very cute ideas for decorating gingerbread houses and a great video tutorial, so you might want to go ahead and bookmark that page for future reference.

It’s a good idea to print two copies of the gingerbread house template, in case you accidentally have a scissor slip. It happens.
Once you have printed your template, find a sharp pair of scissors and get to work cutting out the pieces.
TIP: While you are working on the template, remove the dough you made yesterday from the refrigerator and let it approach room temperature. There will be less cracking of the shapes and the dough will be easier to roll.

Roll the Dough
TIP: Generously flouring the counter and rolling pin makes this step much easier.
Working with one round of dough at a time, roll the dough to 1/4-inch thickness. It will be thin and delicate, but it will bake up nice and crisp, perfectly sturdy for the walls and roof of your house.

Begin in the center of the dough and roll outwards, moving clock-wise around the disc of gingerbread dough. Don’t worry if it tears; just patch it back together and keep going.
Cut the Pieces
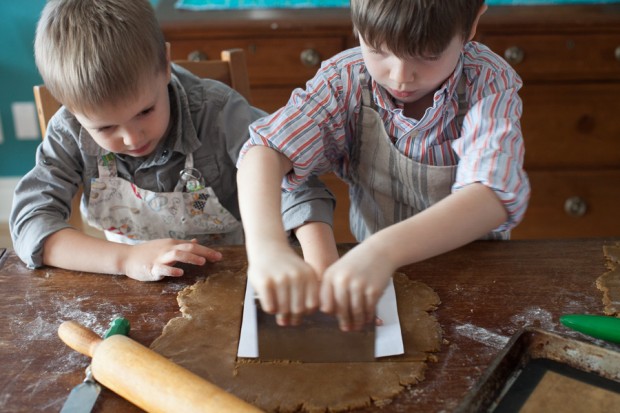
Once the dough is rolled out, you are ready to cut the pieces of your gingerbread house. This takes a bit of teamwork. One person should hold the template piece firmly on the gingerbread, while the other person cuts around it.
TIP: Use a pastry bench scraper to cut the dough if you are not quite old enough to use a big knife.

Keep working until you have all the pieces cut out. You will need to use two rounds of dough, and maybe more.
Use a large spatula to carefully transfer the pieces from the counter to the baking tray. If you have any “oops”, just push the cracks together. They will bake back together in the oven.
Tip: Remember, you can always re-roll the scraps of dough and cut new pieces if any get mangled in the move.

Here are all the pieces, cut out and on a baking sheet. We used one really big tray, but you will probably need two regular sized baking sheets.
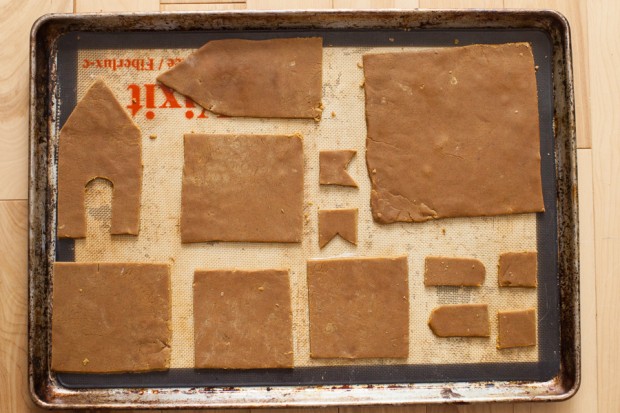
See how they are not perfect? That is totally okay. Those cracks will smooth out, and once the house is decorated? No one will know the difference. I promise.
Baking
Preheat oven to 350F. Always make sure the oven is up to temperature before baking.
Tip: Because gingerbread have a lot of molasses in them that caramelizes, they are susceptible to burning quickly, so keep an eye on them!
Bake gingerbread on the center rack of your oven for 9 to 12 minutes, or until the shapes are slightly darker around the edges.

Remove the gingerbread house shapes from the oven and let them cool for a few minutes on the cookie sheet. With a thin spatula, transfer the shapes to a wire rack to cool completely.
Store the pieces of your gingerbread house in an airtight container until you are ready to assemble the house. That is coming up tomorrow. Are you excited yet?
Coming Up:
Introduction to the project.
Day 1: List of ingredients and equipment.
Day 2: Make and chill the dough.
Day 3: Cut and bake the pieces.
Day 4: Prepare Royal Icing + assemble the base.
Day 5: Decorate!
How is it going so far? Having fun? Are you barely keeping up or raring to keep going?
CURRENT SPONSORS:
- No More To Go - Healthy Meal Plans.
- Thrive - Your favorite foods. REDEFINED.
- Easy Homemade - Homemade pantry staples for the busy modern family.
- Smart Sweets - 30 desserts to indulge your sweet tooth..
is a post from Simple Bites
© 2010-2013 Simple Living Media, LLC | All rights reserved - This feed is provided for the convenience of Simple Bites subscribers. Any reproduction of the content within this feed is strictly prohibited. If you are reading this content elsewhere, please contact hello@simplelivingmedia.com to let us know. Thanks.